Convert Images to WEBP Files for Website Speed Improvements
If you're looking to speed up your website, converting your images to WebP files is a fantastic step. WebP is a modern image format that offers great compression without sacrificing quality. By switching to WebP, you can reduce your image file sizes, which means faster load times and a better experience for your visitors, especially those on mobile devices. Not only does this make your site quicker, but it also helps with SEO and saves bandwidth. Let’s walk through how you can easily convert your images to WebP Files and give your site a speed boost!
We offer 3 instructions for converting images into .WEBP files
- Adobe Photoshop: If you have Adobe Photoshop, you can easily convert your images to WebP format.
- Command Function: For those comfortable with command-line tools, you can use command functions to convert images to WebP.
- Online Converters: If you prefer a quick and easy method, online converters are a great option.
Which instruction would you like to use?
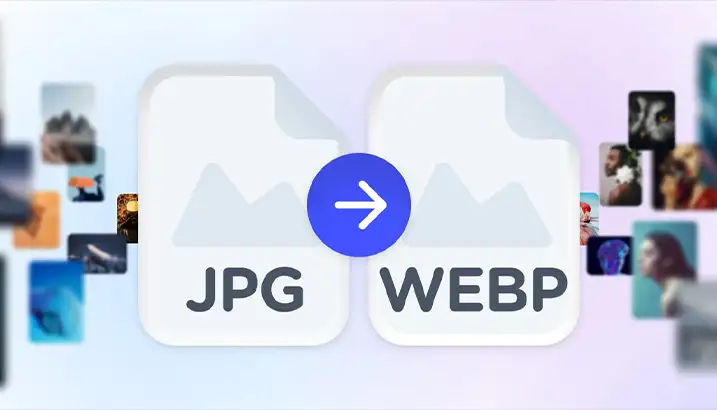
1. Convert with Photoshop
If you’re a Photoshop user, converting images to WebP format is straightforward and efficient. Photoshop offers powerful tools that allow you to control the quality and compression settings of your images. This method is ideal if you already use Photoshop for your image editing needs and want to integrate WebP conversion seamlessly into your workflow.
Single Image Conversion:
To convert a single image to WebP in Photoshop using the "Save As Copy" method, follow these steps:
- Open your image in Photoshop.
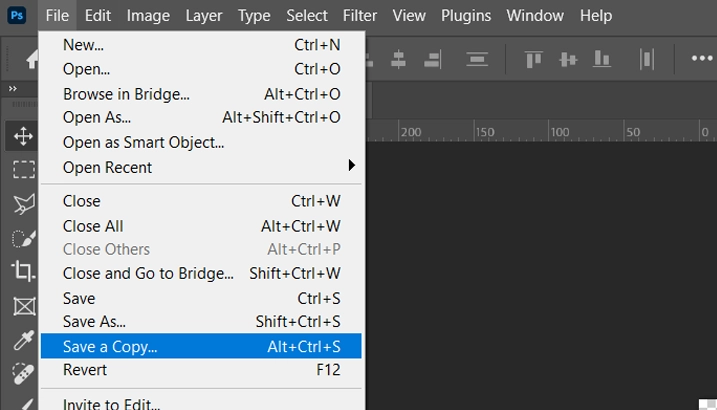
- Go to 'File' > 'Save As Copy'.
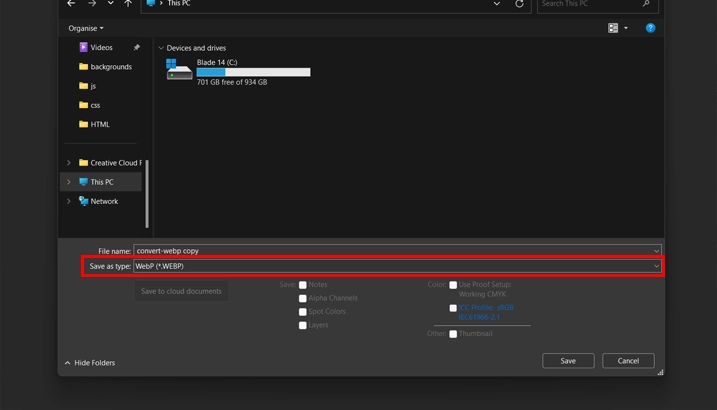
- In the dialog box, choose 'WebP' from the format options and click 'Save'.
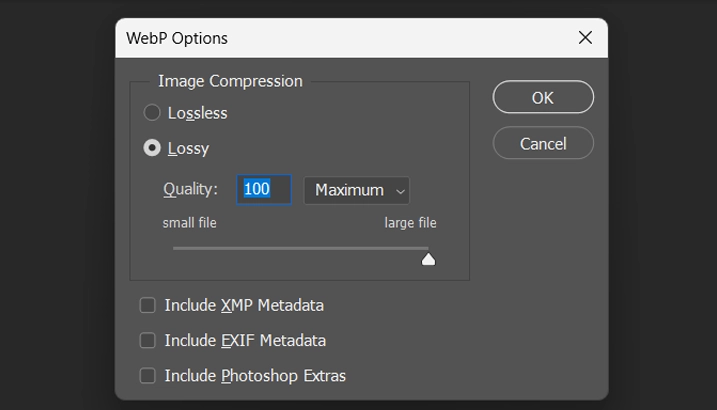
- A popup will appear allowing you to adjust the quality and compression settings. Set it to around 75% for a good balance between image quality and file size.
- Click 'OK' to save the WebP version of your image.
Multiple Image Conversion:
To convert multiple images to WebP format in Photoshop, follow these steps:
- Place all the images you want to convert in a single folder.
- Open any image in Photoshop and go to 'Window' > 'Actions'.
- Click Create New Action, name it, and click 'Record'.
- Perform the single image conversion steps: 'File' > 'Save As Copy', choose 'WebP', adjust settings, and save.
- Stop the action recording.
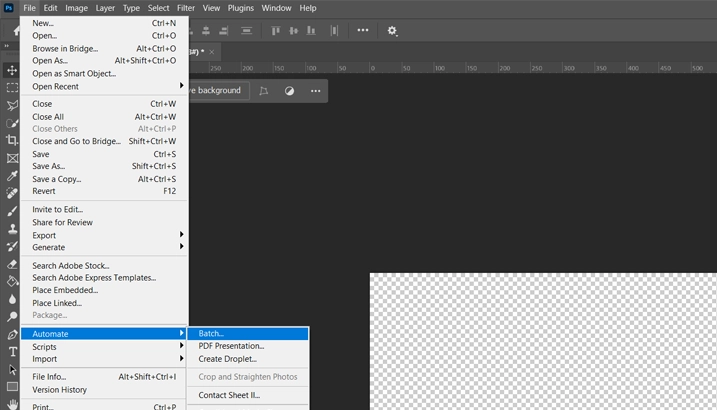
- Go to 'File' > 'Automate' > 'Batch'.
- Select your created action, choose the source folder, and specify the destination folder.
- Click 'OK' to start the batch conversion.
2. Convert with a Command Prompt
Using the command prompt for converting images to WebP is a powerful and flexible option, especially if you’re comfortable with command-line tools. This method leverages Google's WebP utilities, which offer precise control over the conversion process. It's perfect for users who prefer a more technical approach to image optimisation.
Single Image Conversion:
To convert a single image to WebP using the command prompt, follow these detailed steps:
- Visit the Google WebP download page and download the WebP utilities for your operating system.
- Extract the downloaded files to a convenient location, such as the 'Documents' folder.
-
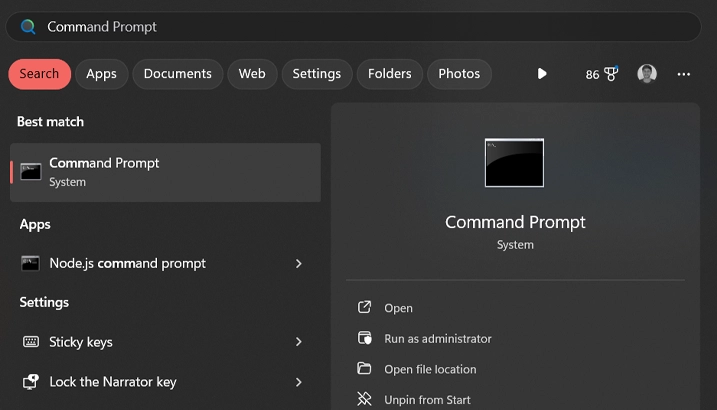
Open Command Prompt:
- On Windows: Press Win + R, type cmd, and press Enter.
- On macOS: Open Terminal from the Applications > Utilities folder.
- On Linux: Open your terminal application.
- In the command prompt or terminal, navigate to the folder where you extracted the WebP tools. For example:
- Use the 'cwebp' command to convert your image. Replace 'input.jpg' with the full path to your image and 'output.webp' with the desired output file name. For example:
- To adjust the quality, add the '-q' parameter. For example, to set the quality to 75%, use:
- Press 'Enter' after typing the command.
- Check the specified output location for the newly created 'output.webp' file to ensure the conversion was successful.
cd Documents/webp
                   # On Windows
                  cwebp "C:\path\to\your\image\input.jpg" -o "C:\path\to\your\image\output.webp"
                   # On macOS/Linux
                  cwebp /path/to/your/image/input.jpg -o /path/to/your/image/output.webp
                   # On Windows
                  cwebp "C:\path\to\your\image\input.jpg" -q 75 -o "C:\path\to\your\image\output.webp"
                   # On macOS/Linux
                  cwebp /path/to/your/image/input.jpg -q 75 -o /path/to/your/image/output.webp  # On macOS/Linux
Multiple Image Conversion:
To convert a single image to WebP using the command prompt, follow these detailed steps:
- Visit the Google WebP download page and download the WebP utilities for your operating system.
- Extract the downloaded files to a convenient location, such as the 'Documents' folder.
- Place all the images you want to convert in a single folder for easier processing.
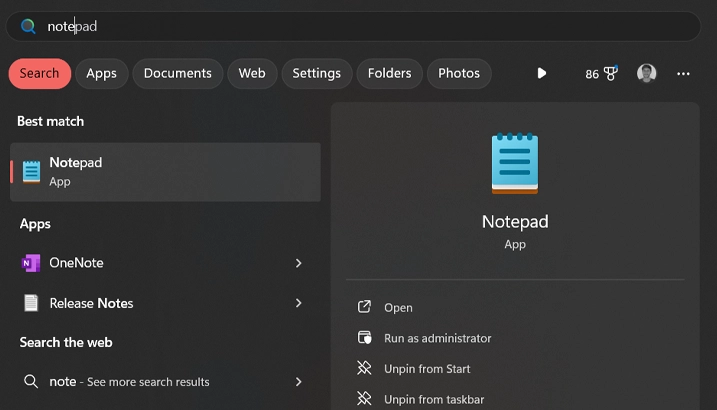
- Open the 'Text Editor' and create a new file named 'convert.bat' (on Windows) or 'convert.sh' (on macOS/Linux).
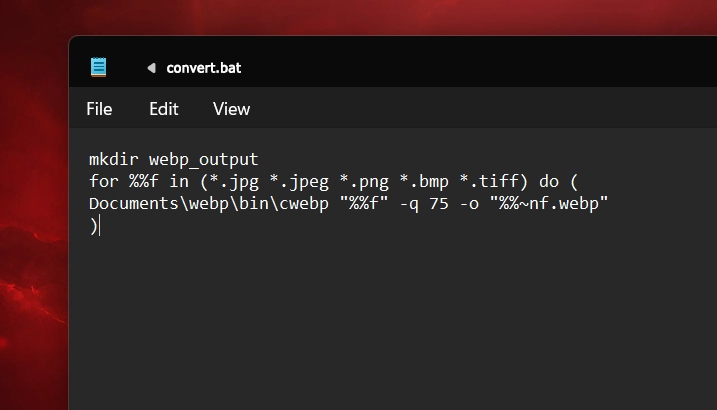
- Add the following script to convert all supported image files in the folder:
- Save the script file in the same folder as your images.
- Open the 'Command Prompt' or 'Terminal' and navigate to the folder where your script and images are located:
- Run the script by typing 'convert.bat' (on Windows) or 'sh convert.sh' (on macOS/Linux) and pressing 'Enter'.
- Check the folder for the newly created '.webp' files to ensure the conversion was successful.
                  for Windows
                  mkdir webp_output
                  for %%f in (*.jpg *.jpeg *.png *.bmp *.tiff) do (
                  Documents\webp\bin\cwebp "%%f" -q 75 -o "%%~nf.webp"
                  )
                  for macOS/Linux:
                  mkdir -p webp_output
                  for f in *.jpg *.jpeg *.png *.bmp *.tiff; do
                  ~/Documents/webp/bin/cwebp "$f" -q 75 -o "${f%.*}.webp"
                  done
cd /path/to/your/images
3. Use an Online Converter
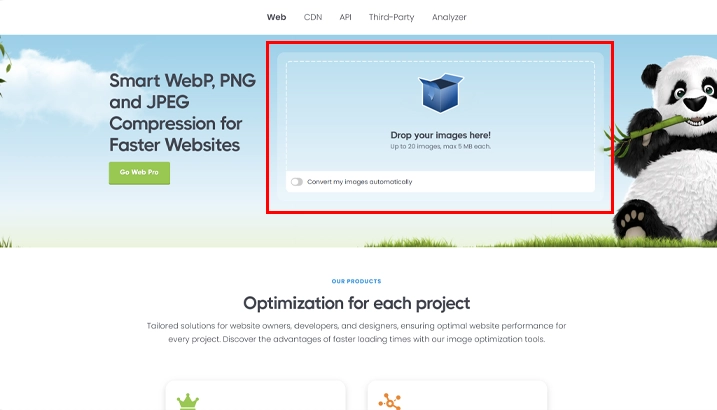
Using an online converter is a quick and convenient way to convert your images to WebP format without needing to install any software. This method is perfect for users who prefer a simple, user-friendly solution and have fewer images to convert. Online converters allow you to upload your images directly from your computer, adjust conversion settings, and download the optimised WebP files in just a few clicks.
Single and Multiple Image Conversion:
- Choose a reliable online converter such as:
- Choose a reliable online converter such as:
- Visit the website of your chosen converter.
- Look for an upload button or drag-and-drop area.
- Click the upload button and select the image files you want to convert from your computer, or drag the files into the designated area. Many converters support batch uploading, allowing you to select multiple images at once.
- After uploading, select WebP as the output format for the images. This option is usually available in a dropdown menu or settings panel.
- Some converters allow you to adjust settings such as quality or compression level. Set these according to your preferences, typically a quality setting of around 75% balances quality and file size.
- Click the convert button to start the conversion process. The converter will process the images and convert them to WebP format.
- Once the conversion is complete, download links or a zip file containing all the converted WebP files will appear.
- Click the download link/button to save the converted WebP files to your computer.
- Open the downloaded WebP files to ensure they have been converted correctly and maintain the desired quality.
4. Converting WebP Back to Other Formats
While WebP is a great format for optimising web images, there may be times when you need to convert WebP files back to more widely-used formats like JPEG or PNG. Whether it's for compatibility with specific software, printing purposes, or other reasons, converting WebP back to other formats is straightforward.
To convert a WebP file back to another format using Photoshop:
- Open your WebP image in Photoshop.
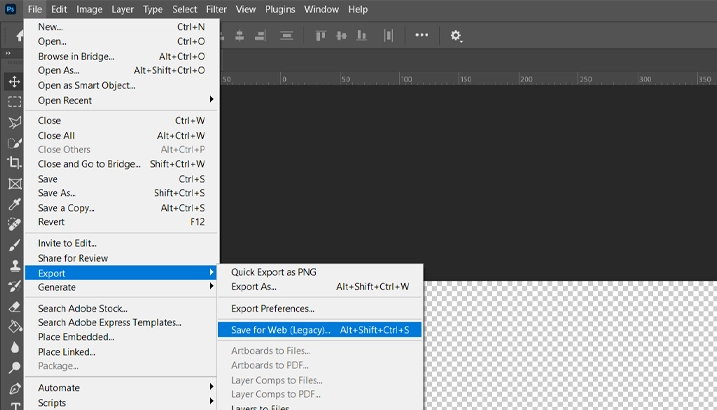
- Go to 'File' > 'Export' > 'Save for Web (Legacy)'.
- Choose the desired format (JPEG, PNG, etc.) from the dropdown menu.
- Adjust any settings as needed and click 'Save'.
To convert a WebP file back to another format using command prompt:
- Use the 'dwebp' command to convert your WebP image. Replace 'input.webp' with the path to your WebP image and 'output.jpg' with the desired output file name and format. For example:
- Adjust the output format as needed (e.g., 'output.png').
- Check the output location for the newly created file to ensure the conversion was successful.
cwebp "input.webp" -q 75 -o "output.jpg"
5. Additional Tips and Best Practices
Converting images to WebP format and back again is just the beginning of optimising your website’s performance. To truly maximise your site’s speed and efficiency, it’s important to follow additional tips and best practices. By implementing these best practices, you can enhance user experience, improve loading times, and achieve better SEO results for your website.
5.1 Quality Settings:
- Balancing Quality and Size: Adjust the quality settings to find a balance between image quality and file size. A quality setting around 75-85% often provides a good balance for web use.
- Lossless vs. Lossy: Use lossless compression for images where preserving every detail is crucial, like logos or detailed graphics. Use lossy compression for photographs and images where slight quality loss is acceptable to save on file size.
5.2 Use Modern Web Techniques:
- Lazy Loading: Implement lazy loading for images to improve page load times by loading images only when they enter the viewport. This is particularly useful for pages with many images.
- Content Delivery Networks (CDNs): Use CDNs to serve your images, which can provide optimised and faster delivery to users around the globe. Many CDNs offer automatic WebP conversion. We recommend Cloud Fare.
5.3 SEO:
- Alt Text and Descriptions: Ensure all images have appropriate alt text and descriptions to improve accessibility and SEO.
